How to create a CI/CD pipeline for a React app (1st part)
I wanted to write a tutorial on how to dockerize an application, make it production ready, setup CI/CD workflow and eventually deploy it to AWS. So here in that first part we will see how to dockerize a react app for development, testing and production enviroments.
The final flow will look like:
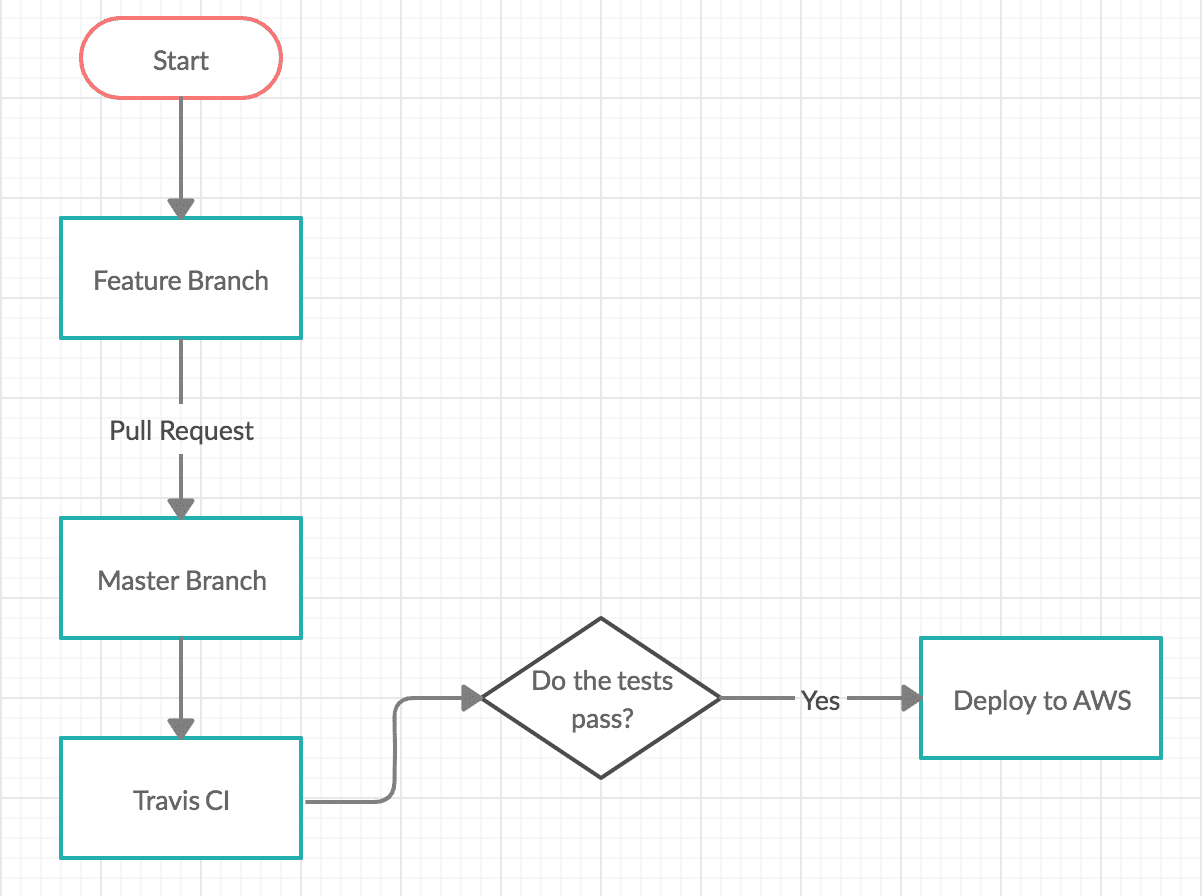
The tools/services that we will use are:
- Node/NPM
- create-react-app
- Docker
- nginx
- Travis
- AWS
Create react app has 3 main commands, each for one of our 3 enviroments.
| Command | Explanation |
|---|---|
| npm run start | Starts development server |
| npm run test | Run tests |
| npm run build | Builds a production version of the application |
Docker for Dev Enviroment
First we will dockerize our application for the development enviroment. Let’s create a dockerfile for our it and name it Dockerfile.dev. We use the node:alpine image as base, setting up a working directory, copy the files from the host machine and start the development server.
FROM node:alpine

WORKDIR '/app/'

# It's important to copy package.json seperately
# and install the depedencies before we copy our
# actuall application files
COPY package.json .
RUN npm install

# If we change something in our application files
# we don't need to re-build the whole container
# the cache will be used so we avoid waisting time
# by running npm install again
COPY . .

CMD ["npm", "run", "start"]
To build a container out of it we can run docker build with the -f flag
docker build -f Dockerfile.dev .We can run the container using the id that is generated by the docker build. We need to specify the ports that we want to be exposed so we can access the app from our host machine. Something like:
docker run -p 3000:3000 CONTAINER_IDWith the COPY command in our dockerfile, we essentially did the following:

The problem with this is that if we make any change to our application on the host, our container do not have the changes, so we can’t see them. We would have to re-build the image, which obviously it is not ideal since it can be time-consuming. To fix that we can make use of Docker Volumes.
Docker Volumes
With Docker Volumes what we do is to set a referrence to the folders in the host machine.

To do that we can run:
docker run -p 3000:3000 \
 -v /app/node_modules \
 -v $(pwd):/app CONTAINER_ID
Let’s explain a bit that part of the command
-v /app/node_modules -v $(pwd):/appIt basically says “Whenever you want to use something on the app folder in the container, look in the host machine working directory except the node_modules folder”
The reason of excluding the node_modules is because we may wanna delete the ones from the host machine
since the are not really needed, and by not specifying a : there we basically say to docker use the ones from the container, so all the npm commands will still be working.
Docker-Compose
Of-course having to write this long commands is not ideal. We can create a docker-compose file that will mimic the previous commands.
version: '3'
services:
  frontend:
    build:
      context: .
      dockerfile: Dockerfile.dev
    ports:
      # export container port to host
      - '3000:3000'
    volumes:
      # do not map the node modules of the container
      - /app/node_modules
      # treat the current directory as a container directory
      - .:/app
Running tests
We can create a new container to run our tests
docker build -f Dockerfile.dev .And to execute a command inside our docker container we can do
docker run -it CONTAINER_ID COMMANDAs we said to run the tests create-react-app specifies a npm script,
npm run test, so we can do:
docker run -it CONTAINER_ID npm run testThis would work just fine, but any changes in our tests will not trigger a re-run of the test suite. That’s because the command creates a new temporary container that do not have volumes setup up. Instead of creating a new temporary container we can attach to the existing running container of our development enviroment and execute the tests there:
docker exec -it CONTAINER_ID npm run testdocker exec is helping to interact with a running container.
This temporary solution is working fine, but is not suitable when we want to build a CI/CD flow because in reality we are peeking inside another service to run our tests.
So it will be better to create a service just for running our tests:
version: '3'
services:
  frontend:
    build:
      context: .
      dockerfile: Dockerfile.dev
    ports:
      # export container port to host
      - '3000:3000'
    volumes:
      # do not map the node modules of the container
      - /app/node_modules
      # treat the current directory as a container directory
      - .:/app
  test:
    build:
      context: .
      dockerfile: Dockerfile.dev
    volumes:
      - /app/node_modules
      - .:/app
    # override the default command specified in Dockerfile.dev
    command: ['npm', 'run', 'test']
If we want to interact with the tests cli that Jest provides we can attach a process to the running container
docker attach CONTAINER_IDMoving to production
For production we can’t use the development server that create-react-app
provides as it is not optimised for that, also we want our assets to be
minified etc, for that we need to run npm run build to get a build folder
with all the assets that we need, and then use a better server more suitable
for production. I chose nginx.
We will create a new Dockerfile (without the .dev suffix) and setup a 2 step
process. The first step will build our app, and is the one that is very similar
with our existing Dockerfile (having node:alpine as base image), the second step
will take the outcome of the 1st, use nginx image and run it.
# Build step
FROM node:alpine as builder
WORKDIR '/app/'
COPY package.json .
RUN npm install
COPY . .
## The outcome will go to /app/build
RUN ["npm", "run", "build"]
FROM nginx
COPY /app/build /usr/share/nginx/htmlnginx is serving static content from the /usr/share/nginx/html directory,
so we copied the output of the build process to that directory. We don’t
need to specify any command to start the nginx, because the default command
of the image will already do that. nginx is serving the content on the port 80
so we can see if everything works fine by running
docker run -p 8080:80 CONTAINER_IDThen we can open our browser and navigate to localhost:8080.
In the next part of the tutorial we will build our CI/CD pipeline to move our dockerized app to production.